Pages

Sunday, September 25, 2016

Blending colored pencils with Odorless Mineral Spirits

I bought the stuff to try this technique a long time ago.  As with most techniques that I want to try, it gets sat down and things I want to try tend to pile up in my mind faster than I can do them.  Before I know it, I have completely forgot that I bought the stuff or I forget the technique altogether.  Sad, I know...  I hope I'm not the only crafter that has an A.D.D. brain.

Last night I saw a YouTube video using this technique.  She was using Prismacolor pencils and Gamsol and she was raving about how much she loved her new found technique.  How she loved it better than using her COPICS!  Wait, whhaatt?  Did I just hear she wasn't even using her Copics, anymore?  I knew right then that I had to give this technique a try!

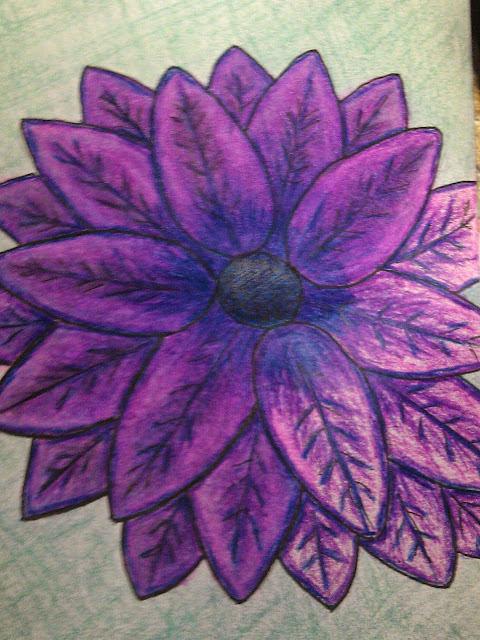
So today, I sat down with my colored pencils, my art journal, and some odorless mineral spirits.  And boy, do I love this technique!
Here is a picture where I stopped after doing most of the flower so you could see for yourself how amazing this technique looks...  If you would like for me to write a tutorial on this technique, just let me know!  I hope you will give this technique a try.

Now go make something crafty...
Bonnie


**IMPORTANT REMINDER-- Gamsol and Odorless Mineral Spirits are NOT FOR CHILDREN!  If you have them in your home, garage, scraproom, etc. please make sure that they are clearly marked, that they are in secure childproof containers, and kept out of reach of children.  If a child happens to get in them, please call you local hospital, poison control center, or 911 for instructions on what to do next!

Halloween Card

The papers are all DCWV and the witch was colored using Spectrum Noir alcohol markers.

Friday, March 27, 2015

Watercoloring Using Stamps and the Stampin' Spritzer

I thought you might like to see a technique video today...  This video is from Stampin' Up but you can use any stamp set and ink pads that you already have.  All you really need is a way to spritz water and some watercolor paper.  You might find experimenting with this technique a lot of fun... Give it a try!


Now go have a wonderful crafty day!

Bonnie


Sunday, March 22, 2015

Suit and Tie? No Way!

It's all about the suit and tie, right?  W.R.O.N.G.  Not today... Today it's all about the Shirt and Sweater.  Let me show you this adorable card that I made...


Check out this card's decked out collar!


This card wasn't difficult at all to make.  The gorgeous double sided paper pretty much does the work for you.  I took a small piece that I had already cut off and adhered it behind the V-neck so it would look like the inside of the shirt.  Then you just cut a slit down the center.  Fold over and then move about 1/4" and fold again to get the collar to really set nicely.

I really hope that you enjoyed the card.  If you make one, share it with me... I would love to see it!  If you have any questions, just let me know.

Now go have a wonderful crafty day!
Bonnie

Up Against A Brick Wall

This project might look very involved and well, I'm not going to lie, it is a little more involved than a normal one layer card BUT you can do this... I promise!  I'm going to walk you through it step-by-step...


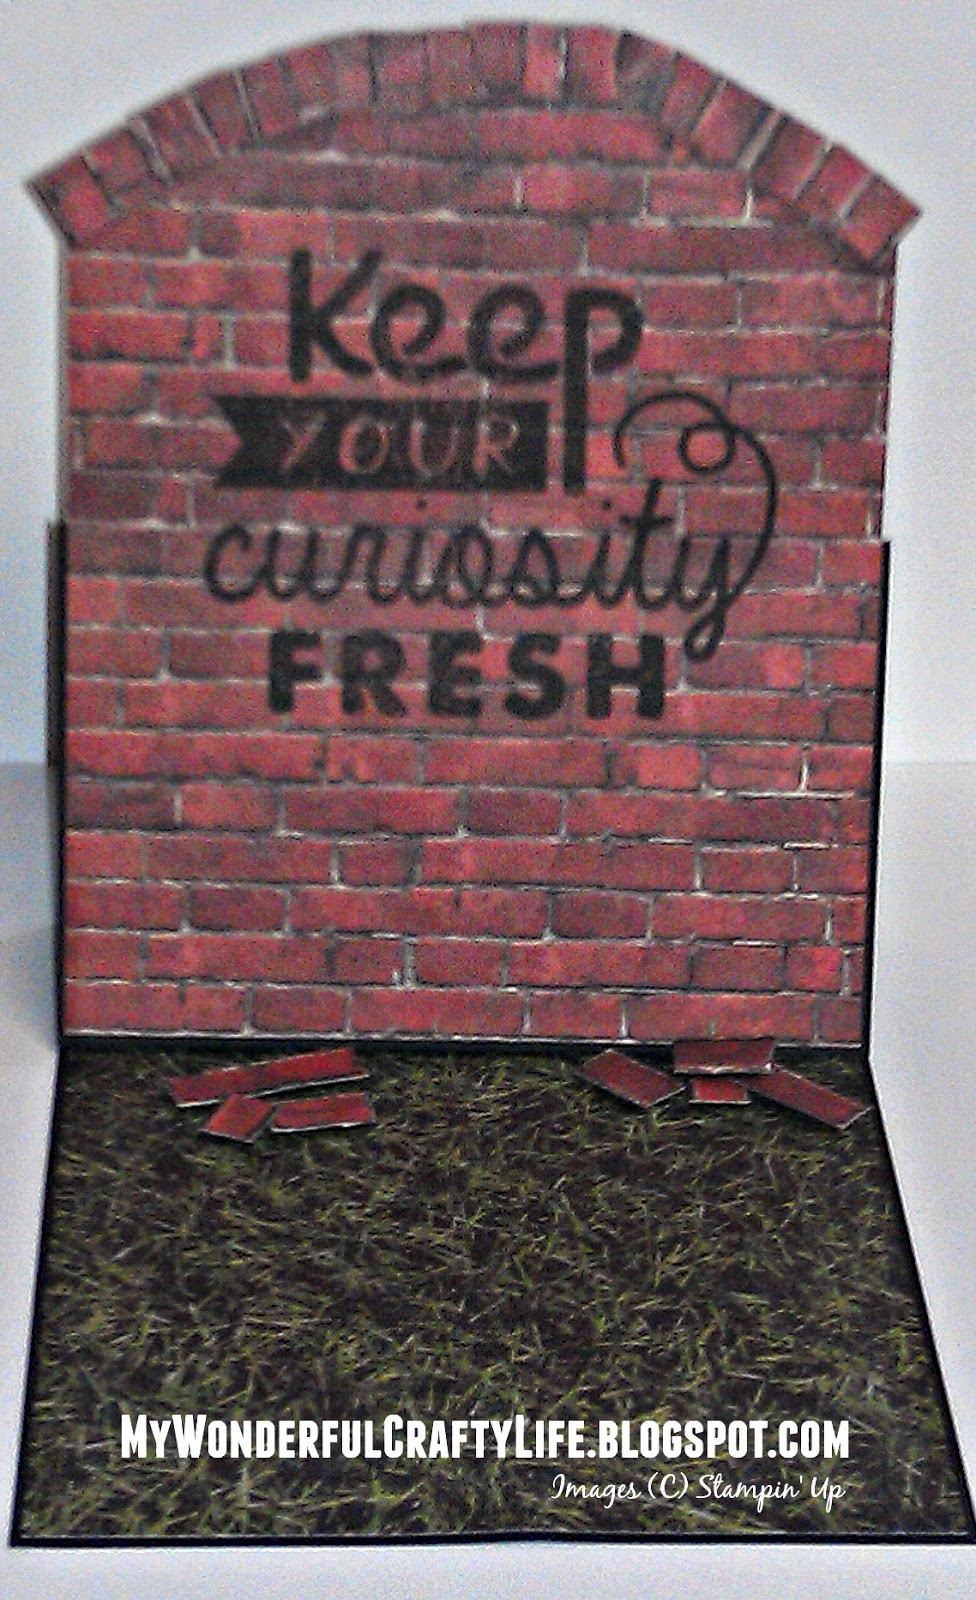
First of all, let's take a look at the finished card.  Here it is 'propped' up with the fallen bricks.
Greeting card to look like a brick wall with fallen bricks on the grass

And here it is fully closed.  (Sorry about the quality of the picture on this one.  I actually forgot to take a picture of this one until I was doing the blog post.  By then, it was late and no natural light.)
Showing sentiment on the wall


It's an Easel Card and they are soooo easy to produce!  I'm going to teach you to make an Easel Card in ANY SIZE you want.  And you won't have to remember any exact measurements.  Deal?  Well then, let's get started...

For the base of the card.  The Easel part.  You only have to remember a couple of things and I'm going to explain that AFTER you make this base.

  •  8 1/2 x 11 Cardstock
  •  8 1/2 side across the top of trimmer.  Cut at 4 1/4.  This gives you two equal size cards.  Set one aside to use at a later date.
  • 11" across the top of trimmer or scoreboard.  Score @ 5 1/2".
  • 11" still across the top.  Score @ 2 3/4".
  • Now crease you folds and you have completed the base!

Here is a side view so you can see how the base should make the triangle when folded properly.
Propped up easel card


Easy Tip Insert:
Now let me tell you how to use any size cardstock.  On the longest size, score in half.  Then score one of those halves in half. Voila!  There you have it... Your base!  From there you would just complete it as if making a regular card.  The only difference is that your top mat (or what would be the front of the normal card) will not get glued all the way down.  It is only glued to the folded over part.

Now, back to the slightly more complicated card above.  Set your base aside.  We are going to work on the mats.

The bottom mat (the one that looks like grass here)...
Cut you paper to 4 x 5 1/4.  Keeping in mind that the TOP of your mat will be the 4" size, make sure the orientation of your paper is correct.  Place adhesive on the back and put it on the bottom of your Easel Base.

The top mat (the one that looks like a brick wall)...
Cut you paper to the same as above 4 x 5 1/4.  Again, keeping in mind that the top of your mat will be the 4" size, make sure the orientation of your paper is correct.

Easy Tip Insert:
If you were making a normal rectangle top Easel card without the fancy curved edge, then this would be your finished size.  Decorate your card however you wish from here.

You need something to shape the top of your brick wall into a curve.  I'm going to be honest, I used a small plate.  You could use a can, circle framelits, freehand... It really doesn't matter what you use.  I say the simpler, the better.  So go ahead and cut your curve.  You don't need to cut much off, just get the curve how you like it.  Or hey, you could do it square!  Nobody says this part HAS to be curved...  This part is all just preference.  SAVE THAT CUT OFF CURVED PIECE!  We will be using it in a minute to give the card a completed look.

Time to stamp your sentiment!!  Just center up and stamp...

Now that you have your curve (or not curve...lol) and you have stamped your sentiment, we are going to work on the rowlock.  If you have some bricks that you can use in the pieces that you cut off, then you can use that.  DO NOT use the curved piece that you cut off.  You will be adhering this to the top of the front (so that when the card is closed it will look like a brick wall behind the rowlock.)  If not, grab a full sheet and cut off about two rows (across the short side).  We are going to be cutting half-size bricks.  When I did mine, I tried to leave some of the bricks with mortar on both sides and some of the bricks had no mortar.  After you get about 20 (I used 18 but your count will depend on your curve.  Just use however many you need.) half-size bricks cut, then cut dimensionals  into halves and place all along the curve.


Hand cut bricks to make a curved top of wall


Place your brick halves along the curve, adhering them to the dimentionals or shaker frame adhesive strips (I also placed just a tiny bit of liquid glue on the back of my bricks for strength).  So that you can utilize the brick halves without mortar, use the following order:  brick with mortar, brick without mortar, brick with mortar, etc.  My half bricks were a mix... Some had mortar on both sides, some no mortar, some only on one side.  Just do whatever you think looks good.  There is no right or wrong here.  After your rowlock is done across the top, you can adhere your brick wall onto the Easel Base.  Set your grass down, then fold over your base so that you can make sure where you are adhering the brick wall.  It's easy to get confused.  Don't feel bad about actually setting the card up to adhere the wall.  Better safe, than sorry...

Hand cut bricks glued on grass paper to resemble fallen bricks


The fallen bricks (or leftover ones from the construction)...
Again, a mix of bricks. Some full size, some half bricks.  You DO want to leave mortar on all edges here, though, because they are very visible down there all by themselves!  Figure out where you want your brick wall to stop and place a light pencil mark where the bricks will get glued down.  You just need a general idea.  You can adjust with that second stacked brick on top.  Using dimensionals or shaker frame strips and liquid glue, place your first bricks down haphazardly but making sure you are at your pencils marks.  You can 'prop' your brick wall up and check to make sure you have a good fit where your bricks are currently.  Once you get that first set on the ground, you can 'prop' your wall up and adjust with your second stack.

You should be good to go now.  You can place a sentiment on the grass if you wish.  I decided not to because I wanted my fallen bricks to be the focal point.  Again, it's all preference...

I don't think that I left anything out but this card is probably better suited to a video tutorial.  Maybe I'll have to do that.  If you have any questions, let me know.

Now go have a wonderful crafty day!
Bonnie
Saturday, March 21, 2015

Ornament with Patterned Paper

Patterned paper with real life picture quality on one side and patterned paper on the other side.  What's not to love, right?  Unfortunately, like I have heard so many of people say, I struggled with actually putting it to use, too.  I searched blogs and Pinterest and Instagram.  Nothing really stuck out to me.  Now don't get me wrong... I loved everything that I saw but I was on the hunt for something different!!  So, my very gorgeous new paper just sat there... Lonely.

Until... 

I received a challenge to turn a tiny treat box into a fun 3D project.  I already knew that one of my favorite things to do with these boxes is turn them into Christmas ornaments.  Since I have vowed this year to get a jump on the Christmas season and try to do a project a month dedicated to Christmas, why not...

Now mind you, Christmas ornaments don't always have to be Christmas themed.  So thinking outside the box, I decided to use some ocean looking paper that I had in my stash.

Here is the finished project:


All of the small squares measure 1 7/8 x 1 7/8.  That's just about a perfect size for this little box.  There are some seriously gorgeous papers...

How about that life preserver on the top?  Isn't that just so cute?   I punched a circle with the 1" circle punch then centered it inside the 1 1/4" circle punch.  I just tore small sections and wrapped it on each quarter section of the life preserver.  The great thing about washi tape (besides the obvious, that it's beautiful) is that it's repositionable!  So, if you don't get it right to begin with then just peel it off and do it again...  

To finish off the project, I punched a hole in the center of the top.  Then I cut a strip off of the width of some white jute ribbon, leaving me just a small section to feed through the hole.

Just one last little thing...  Pull a single strand from that leftover white jute ribbon that you just trimmed.  Turn your life preserver over and run some adhesive all along the back.  You could just put it in spots but trust me it will make your life so much easier and you won't struggle as much if you pretty much run it all the way around the back.  Ok, now you are going to stick one loose end of the ribbon strand to the back (where you ran the snail) then wind it loosely in and around the life preserver (making sure to catch it on the adhesive in the back each time you pass through)...  When you are satisfied with the results, trim the end and stick it into the adhesive.  Cut your dimensionals into pieces small enough that they won't show and slide your finished life preserver down over the jute ribbon hanger.  VOILA, your done!!

If you have any questions, please let me know...

Now go have a wonderful crafty day,
Bonnie

Sunday, February 22, 2015

Butterflies, Butterflies, Butterflies (and Some Flowers)

I am loving me some Butterflies right now...  Well, I love real butterflies all the time but the ones that I am referring to are crafting butterflies...

Lots of butterflies and flowers...

Happy Birthday card with Butterfly


Thinking of You using Butterfly and Inlay technique

Just for You using butterfly die and Inlay technique


How 'bout the two gorgeous cards above??  I used a faux watercolor technique.  I just simply took a piece of white cardstock (big enough to cover the butterfly die cut), some of my favorite ink colors, a few sponges and blended the inks randomly all over the white cardstock piece.  I then glued the inked piece to the back of my mat, making sure to cover the opening completely.  Then it was just a matter of securing the butterfly die cut back into the hole.  They are both adhered a little differently.  The top one is glued all the way down.  I then added some rhinestones for the body.  You can't really tell it from the picture but the bottom card has TWO die cut butterflies on the card.  There is a yellow one that is glued all the way down and then the top black butterfly is only attached at the center body.  The rest of it flies freely (grins)... I added a button and some baker's twine to the body of this butterfly. 

On to some more fun... Here are the three more projects that I completed...

Greeting card using rose stencil, peach roses, and happy birthday

Greeting card using peach roses, rose overlay, and sentiment stamp

Birthday box using peach roses, doily, stamp


Well, I hope you enjoyed the projects that I shared with you.  I know I sure enjoyed doing them!  It's a great day when you can spend it doing something that makes you smile...

Now go have a wonderful crafty day!
Bonnie


Wednesday, September 24, 2014

Adore

Greeting card using patterned paper and stamps

I absolutely love how this card turned out in the end!  BUT... let me just tell you that I struggled SEVERAL days with this one!  Do you guys ever do that?  Start out with a general design in mind... or a color scheme in mind?  Then nothing... and I mean NOTHING that you put together seems to make you happy?  I HATE when that happens!  I am going to tell you my little secret to this problem... I just walk away!  Leave the card or scrapbook layout or whatever it is that you are struggling with together as much as you can on the table and just walk away from it.  Glance at it as you go by and see if it looks good to you.  Sometimes I am just too close to the project.  Getting up and moving around will give me a different perspective... helps me see the project differently.

The card that I made looks amazing in real life but the picture just doesn't do it justice.

I have a LOT of others things that I want to share with you, if I can just find the time... And keep a computer alive long enough.  Hopefully, there is a new laptop in my near future!

So that's all for me right now.  Now go have a wonderful crafty day...
Bonnie

Sunday, September 21, 2014

Birthday Card using Odorless Mineral Spirits


This is the sketch that I used for my inspiration.

Sketch that was used for inspiration to make the card


I love how the card turned out. The ice cream cones were with a technique using colored pencils and odorless mineral spirits... What FUN that is!!

I hope you enjoy the card.

Now go have a wonderful crafty day!
Bonnie

Sunday, September 14, 2014

Blue Bird Christmas

I stamped the image then used water based markers to color it in.  The patterned papers are some older retired paper lines that I had in my stash.  I don't know about you but I have more patterned paper than an army of crafters could use up in a whole lifetime... I'm going to try really hard to start using some of it up!  The sentiment is stamped in the same color marker as the bird and then layered with several different punches!

Greeting card with Christmas tree using patterned paper and punches

I hope that you enjoyed today's project!

Now go have a wonderful crafty day!!
Bonnie

Friday, September 5, 2014

Chase Your Dreams

Dreams. Hopes. Wishes.  We all have them but do we really go after what we want?  I think it's too easy to make excuses so we don't have to work harder for what we really want.  Or maybe we think those things are just way too far out of our grasp.  That they only happen to 'those people' (inserting whatever phrase you would typically use here).  But the reality is that you will never know if you can accomplish something if you don't ever try.  We only get one chance at this life thing, people, and we never know when that chance is up.  I'm a true believer in the 'Bucket List' and I don't think that you should wait until there is a tentative time stamp on your life to begin one.  Where does it say that you shouldn't start to check off those things on your bucket list when you are in your 20s?  I sure wish someone would have planted that thought in my head way back in my 20s. 
Now don't get me wrong here...  I'm not suggesting that you shouldn't be grateful for what you have nor for what you are given.  I just want you to stop and think... Is there SOMETHING that you want to chase but are too afraid to take that leap?  I encourage you to take off after that dream... See where it takes you!


Greeting card with blue butterfly and stamping


This card reminds me of my niece.  She's in her teens now but when she was very little, she would go over to her grandparents' house and chase the butterflies... What a wonderful way to spend the day... In a beautiful flower bed of Lantana standing taller than your head, chasing pretty butterflies...  Thank you, Kelsey, for that awesome memory!

Now go have a wonderful crafty day,
Bonnie

Sunday, August 31, 2014

Thanks card

I love how this card turned out!  I just dug into my stash of patterned papers and cardstock and grabbed a couple of stamp sets and there you go!!  We're done!!

Greeting card with bird in tree silhouette

I challenge you to go drag out some of your older items in your crafting stash and see what you can come up with!  Be sure and share it with me... I would love to see your work.

Now go have a wonderful crafty day,
Bonnie

Tuesday, August 26, 2014

Termite Inspection

We survived the termite inspection!  I know that sounds ridiculous but I get pretty stressed out at just the thought of a stranger going through my house with a fine toothed comb... Or rather a bright flashlight!  Looking in all your closets and at your baseboards... Behind the furniture that hasn't been moved in many years... The poor fellow was extremely nice though.  He even remembered inspecting my mom and dad's house last week.  We had a short conversation, as he was getting started, about how much he enjoyed talking with my dad and that he could have stayed there all day talking with him!  Awwww... That just warmed my heart and the rest of the inspection went really smooth!

I wanted to sit down and work on some card challenges tonight but unfortunately, as part of the cleaning up for the termite inspection, I had put away almost all of my tools, paper, etc.  If my knee wasn't giving me a fit, I would just get it all back out.  That's just not going to happen tonight... I can barely even get around.  I'm going to end up having surgery on this knee before it's over with... I keep hoping that I can make it just a littte bit longer.  I don't know... The pain is starting to get unbearable!

I hope all of you had a great start to your week...

Now go have a wonderful crafty day,
Bonnie

Tuesday, August 12, 2014

Unfinished Cards

I just hit the motherload of unfinished cards... I was looking for a Cricut handbook that I had put down recently in my craft room and found these!
Boy, am I gonna be busy...  I'll share as I get them completed...

What kind of unfinished projects do you have hanging around your crafting space?


Wishing you a wonderful crafty day,
Bonnie

Monday, August 11, 2014

When Skies Are Gray

I love how this card turned out.  I will admit that I struggled with it to begin with...  I just wasn't feeling it or maybe my crafty mojo was way off because I still don't feel good today.  After working with several different patterns on the umbrella, it finally all came together.


Greeting card with umbrella and stamping


I had my sweet parents in mind when I made this card.  I am so very grateful to have a wonderful relationship with both of my parents!  I love you, mom and dad!!

I hope you enjoyed the card.  Maybe it will inspire you to pick up some paper and scissors today.

Hope you have a wonderful crafty day,
Bonnie

Rough Day

My day definitely didn't start the way I had planned.  It all started Saturday morning when I woke up with what felt like a crick in my neck.  By Sunday morning, I was in tears.  Nothing to do but head to a critical care facility and get checked out.  They did lots of x-rays and gave me a shot for pain.  Then the Dr suggested that I go on over to the emergency room if the shot did not seem to be helping the pain.  Yeah, that's probably what I should've done but I just didn't feel like sitting at another emergency center for what surely would have been 2 hours or longer.  We had plans to go to my parents house for supper and to celebrate my mom's and my brother's birthday.  I was thinking if I could just make it through the day, maybe the shot would kick in and ease up my muscles enough to let me get over whatever was wrong.  If you don't already know, I have fibromyalgia and Osteoarthritis.

I made it through supper and cake at my parent's house.  I don't remember much of it except that the shot (or nerves or something) set off extremely bad stomach cramps.  By the time we got back home, I left my son to entertain himself while he finished up his laundry and I went to bed!  6pm and I'm in the bed!  My neck feels a tiny bit better, not much but hopefully tomorrow will be a better day.  As far as the rest of me, I feel like crap now...

Greeting card with flowers made from punches

I didn't put a sentiment on this card.  I think I might use it as a sympathy card.  I never seem to have any on hand when I need them.

Hope you have a wonderful crafty day,
Bonnie

Friday, August 1, 2014

Leaf Card

It's been a couple of crazy days around my house!  We have taken FIVE LOADS to our local Goodwill drop box...  We've been in this same house for a little over 24 years now.  I think that can be good and bad...  It's nice to know that 'home' is always home but it's a lot easier to declutter everything if you MOVE every five years or so.

We worked hard on the shop and the utility room by the back patio on Wednesday and Thursday.  Alex has been doing a great job on the shop.  Finishing the mud on the drywall... getting it ready to paint... That has not been an easy task.

I took a break today... not feeling well!  I think that I got way too hot yesterday... I was outside in the heat most of the afternoon while Alex and I worked on the little utility room.  It was very hot and humid here.  Nice today... wish we would've waited until this afternoon.  We checked the temperature this afternoon when we went for a coffee break- 82 degrees... We rode with the windows down and I took my little furbaby, Fred.  He LOVED it...

I sat down at my table and worked on a quick card.  I stamped these leaves a few days ago and fussy cut them out, distressed the edges (I'm not sure if you will actually be able to see that or not) with my fingernail and then curled them just a little bit to give some dimension.  The vellum quote is one from an old pack that I've had forever... I'm trying to use some of my stuff up... I have enough to last me many, many lifetimes!  You guys know, right??

So here's my card for today... I'm not sure what I will be working on next... hmmmm, the possibilities!

Handmade greeting card with stamped saying

I hope you enjoyed today's project!

Now go have a wonderful crafty day,
Bonnie

Thursday, July 31, 2014

Pinwheel Card

It was a very productive day today!  My son and I took three loads of stuff to our local Goodwill... More loads going out of here tomorrow.  We are trying hard to clean years of clutter and storage out of our shop.

After all of THAT FUN...lol... I decided that I wanted to play.  Time for another card!  I stamped the pinwheels yesterday.  Then I colored them with my Spectrum Noir alcohol markers.  I fussy cut them out while watching tv last night (I'm watching all of the Walking Dead seasons again. Love that show!  Cannot wait til Season 5 begins!).

So enough chitter chatter... Here's my card!


I hope you enjoyed today's project!

Now go have a wonderful crafty day,
Bonnie

Monday, July 28, 2014

Your Kindness

Here's the card that I came up with today...  I absolutely love this color combination!  The supplies that I used were a mix of retired stuff from my crafting stash...


Let me know what you think...

Now go have a wonderful crafty day,
Bonnie

Deer Christmas

I'm going to admit something here...

I have a lot of embossing folders that I have had for a long time and I can probably count on one hand the times that I have went to the trouble to use them.  I don't know why because the end result is usually really nice...


So check out this Christmas card that I made some older patterned papers, cardstock and a retired stamp set.  I used my embossing folder to give the background cardstock some texture.  I colored in the stamp set with my water based markers and I love the end result!

I hope you enjoyed today's project.

Now go have a wonderful crafty day,
Bonnie